Last updated June 2026. Roblox's publishing flow changes from time to time — check the linked Roblox docs for the latest.
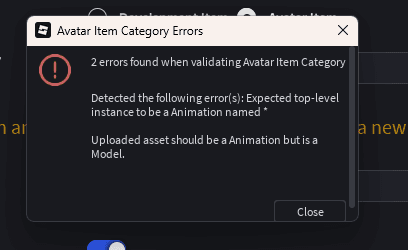
You made a great emote. The motion looks perfect on your R15 rig, you hit upload, you fill out the title and description, you save it... and then it shows up in your Creator Hub under Development Items, never under Avatar Items. So there's no "publish to the Marketplace" button, no upload fee prompt, nothing. Dead end.
If that's exactly where you're stuck, good news: you didn't break anything. You're just missing the one step almost every tutorial skips.
This guide walks through why your animation gets stranded in Development Items, and the exact sequence that gets it published as a real, sellable avatar emote.
Why your animation gets stuck in Development Items
Here's the thing nobody tells you upfront: the animation you publish and the asset Roblox actually sells are two different objects.
When you publish a raw keyframe animation straight out of the Animation Editor, Roblox saves it as a development asset — something a script can play inside an experience. That's why it lands in Development Items. It's working as designed; it's just not an avatar item, so the Marketplace path never opens.
To sell an emote, Roblox needs two specific things, and missing either one keeps you stranded:
The two things Roblox actually requires
- The animation has to be a CurveAnimation, not a plain keyframe sequence. Roblox explicitly requires emote animation data to be curve-based.
- The thing you publish to the Marketplace is an Animation object that points at your animation's asset ID — published as an Avatar Item under the Emotes category.
That's the whole trick. Convert to a curve animation, get an asset ID, wrap that ID in an Animation object, and publish that object as an emote. Let's do it.
Before you start
You'll move faster if you've got these ready:
- Your emote on an R15 rig in Roblox Studio. Emotes have to reference an R15 rig, so this is non-negotiable. If you're generating motion with NoCapMocap, every animation comes out R15-native — generate it, then drop it onto a rig with the Motion Lab plugin or paste it in with Copy to Roblox. No retargeting, no FBX.
- A short emote. Marketplace emotes must be under 10 seconds, and shorter clips read better as emotes anyway. Two to five seconds is the sweet spot.
- A creator account eligible to publish to the Marketplace. Roblox requires creators to be verified before they can sell avatar items. If you've never published a UGC item, check Roblox's Marketplace requirements first.
However you got the animation onto your rig — the NoCapMocap plugin, Copy to Roblox, or any other importer — once it's playing on an R15 character in Studio, you're ready.

Step 1: Convert your animation to a curve animation
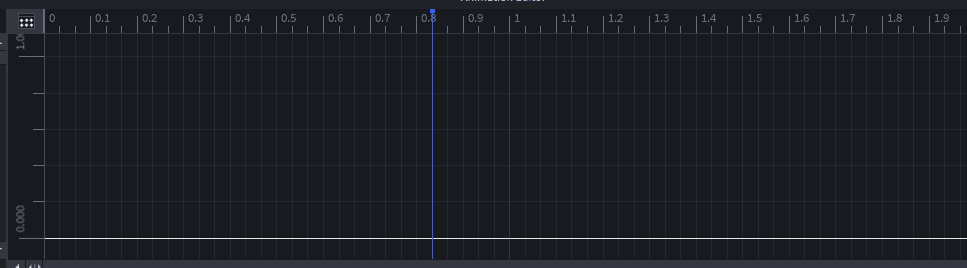
This is the step that fixes everything. Open your animation in Roblox Studio's Animation Editor (Avatar → Animation Editor), then look at the top-left corner of the timeline for the Curve Editor icon — the little curve graph button.
Click it. Studio pops a prompt warning that it'll convert your KeyframeSequence into a CurveAnimation. Accept it. The timeline layout changes from the standard dope sheet into the curve-based view — that visual change is the conversion working.
Convert on a copy, not your only file
Converting a keyframe sequence to a curve animation is a one-way trip — Studio turns rotations into Euler-angle curves and you can't switch them back. Keep a saved copy of the original animation before you convert, so you can re-edit later if you need to.
Step 2: Publish to Roblox to get your asset ID
With the curve animation open, click the ⋯ (three-dot) menu in the Animation Editor and choose Publish to Roblox. Give it a title and description and save.
After it processes, Roblox hands you an asset ID — copy it. (If you don't see it, open the published asset's page and grab the number straight from the URL.) And yes, this animation will show up under Development Items again. That's supposed to happen. This asset ID is the ingredient for the next step, not the final emote.
Step 3: Wrap the asset ID in an Animation object
Now you build the object Roblox can actually sell. If the Explorer panel isn't open, turn it on under View → Explorer first.
- In the Explorer window, click the + on a parent like Workspace and add a new Animation object (its icon looks like three little crescents).
- Select it, open the Properties window, and paste your copied asset ID into the AnimationId field.
That Animation object is the emote. It has no mesh, no texture — just a pointer to your curve animation's asset ID. That's all an emote needs.
Step 4: Publish the Animation object as an Avatar Item
Last step, and this is the one that finally unlocks the Marketplace.
- Right-click the
Animationobject in the Explorer and choose Save to Roblox. - In the upload dialog, set Content Type to Avatar Item.
- Set Asset Category to Emotes.
- Add a title and a description — the description field can't be blank — then wait for the dialog to report validation succeeded before you Submit.
This is where you'll hit the upload fee (paid in Robux) and your emote enters moderation. Once it's approved, it's a live avatar item you can sell on the Marketplace or use inside experiences — exactly the spot you couldn't reach before.
Get it right before you submit
Roblox limits how many emotes you can upload in a given window, and those limits shift over time — creators have reported caps anywhere from one upload a day to a handful a month depending on the period and account. On top of that, a published emote can't simply be edited in place; fixing a mistake usually means burning another upload slot and another fee. So preview the motion, double-check the title and description, and make sure validation passes before you hit Submit.
Best for: Custom emotes, dances, gestures, and reactions you want to sell or share on the Roblox Marketplace.
Not great for: In-experience-only animations a script plays — those never need the curve-animation-to-emote conversion at all.
Don't get rejected on a technicality
Emotes go through an automated validation pass on upload, and a few easy-to-miss rules trip people up. Before you submit, make sure your animation:
- Is under 10 seconds.
- References an R15 rig (this is why R15-native motion saves you a headache).
- Is sourced from a CurveAnimation — the whole reason for Step 1.
- Keeps the character's root joint near its starting position (big bodily travel gets flagged).
- Doesn't move faster than Roblox's speed cap, which exists to block teleport-style abuse.
- Follows Roblox's Marketplace and Community policies.
For the official rundown, Roblox documents the full flow in import and configure emotes and the emote specifications.
Watch it end to end
If you'd rather follow along on video, this walkthrough covers the Studio side of publishing an emote to Roblox:
The short version
The reason your animation kept landing in Development Items was never a bug — it's that emotes need a curve animation wrapped in an Animation object, and most guides never mention it. So, start to finish:
- Get your emote onto an R15 rig in Studio.
- Convert the animation to a curve animation (Curve Editor icon).
- Publish to Roblox to get an asset ID (Development Items — expected).
- Create an Animation object and set its AnimationId to that asset ID.
- Save the Animation object as an Avatar Item → Emotes, pay the fee, and wait for moderation.
That's it. Once you've done it once, the whole thing takes about five minutes.
See what's worth publishing
Every clip below was generated as R15 motion and applied to a rig in Studio — the kind of animation that's ready for the curve-and-publish flow above.
Need ideas first? Here's how to create custom emotes for Roblox with AI, and if you're still wrangling imports, how to import Roblox animations without Blender clears that up too.
FAQ
Why does my Roblox animation only show up under Development Items?
Because you published a raw keyframe animation, which Roblox treats as a development asset — not an avatar item. To list an emote on the Marketplace you need two extra steps: convert the animation to a CurveAnimation, then wrap its asset ID in an Animation object and publish that object as an Avatar Item under the Emotes category.
What is a curve animation and why does Roblox require it for emotes?
A CurveAnimation is Roblox's curve-based animation format, edited through the Curve Editor inside the Animation Editor. Roblox requires every Marketplace emote to be sourced from a curve animation. You convert a normal keyframe sequence by clicking the Curve Editor icon in the top-left of the timeline and accepting the prompt.
How do I turn an asset ID into an emote I can publish?
Publishing your curve animation gives you an asset ID. In the Explorer, add an Animation object and paste that ID into its AnimationId property. Then right-click the Animation object, choose Save to Roblox, set Content Type to Avatar Item and Asset Category to Emotes, and submit. Only the Animation object can be published as an emote.
Does it cost money to publish an emote on Roblox?
Yes. Roblox charges a per-item upload fee in Robux when you submit an avatar item, and every emote goes through automated and manual moderation before it goes live. You also need a Roblox creator account that's eligible to publish to the Marketplace.
What are the requirements for a Roblox emote animation?
An emote must be under 10 seconds, reference an R15 rig, and be sourced from a CurveAnimation. The character's root joint can't drift too far from its starting position, movement speed is capped to prevent teleport abuse, and the animation has to pass Marketplace and Community policies.
How many emotes can I upload to Roblox?
Roblox caps how many emotes and avatar items you can upload in a given window, and the number changes over time and by account — creators have reported limits ranging from one a day to a handful a month. A published emote also can't be freely edited afterward, so get the animation, title, and description right before you submit to avoid wasting an upload slot and the fee.
Got your emote onto a rig but stuck at the upload? Generate a Marketplace-ready R15 animation →


